background

Showing posts with label Gifts. Show all posts

Wednesday, April 22, 2015

Notepads w/Inspired Stamps


These fun little notepads, using Inspired Stamps 2x2 scripture stamps, are a result of my Spring purging frenzy.  My son and I have been cleaning out closets and scaring away dust bunnies all month! My scrap studio is definitely the most challenging because I hate to waste pretty scraps and bits and bobs of cute stuff ! I was about to toss some index cards from my old school supply stash since my youngest graduated a year ago. Then it hit me that I could save the cards AND some of my scrap stash by combining the two.  


I used my Cuttlebug to die cut the index cards, a piece of patterned paper and a solid piece of cardstock. Stacked them together, hole punched the corners, attached a ring and added a scripture and bits of ribbon and simple embellishments.  The stamps I used were Isaiah 40:31 and Psalm 28:7


Now I have a stash of cute gifts for any occasion!


Tuesday, December 18, 2012

Last Minute Gift with Inspired Stamps


Wow! This is my last post before Christmas.  Are you feeling the pressure??  Never fear, the Inspired Stamps Design Team is sharing last minute gifts with  you today.   My project can hopefully be made without trying to wade through crowds of shoppers.  The only thing you might  have to purchase is the mini clothespins (Wal-mart office supply dept)  but if you bought some a few weeks back when I showed you the ribbon calendar, you just may have a couple laying around!

For the scripture card, I used a beloved scripture from Inspired Stampers Favorites #1 set.  I love vintage wooden spools and that is the base of this project.  The one I used is about 2" high.  just remove the old thread and adhere scrapbook paper around the spool.  If desired, cut a circle the size of the top and adhere it as well.  Decorate the spool as desired and then use a strong liquid adhesive to attach ONE side of the mini clothespin to the top.  If you glue both sides, you won't be able to open the thing!  ask me how I know-LOL!

For your recipient, you could give them a set of scripture cards to change out.  They can also be used to display a photo.  As I sign off for the holidays, let me say Have a Blessed Christmas!

Friday, November 9, 2012

Inspired Stamps Tutorial: Ribbon Calendar


It's my turn to share a tutorial as part of the Inspired Stamps Design Team!  I am excited to share a fun Christmas gift you can make fairly quickly and inexpensively.  The ribbon calendar is my daughter-in-love's favorite thing I have made for her and she requests a new one every year.  I have used Inspired Stamps for my scripture panels.

These are the basic supplies you will need: 5- 6x6 decorative papers (I like to grab a 6x6 paper pad), 5- 5 1/2 inch heavy cardstock sheets, roll of ribbon, mini monthly calendars, mini clothespins or decorative paper clips or bulldog clips, assorted embellishments, stamped scriptures
Choose the pages for your scriptures and glue down your clips.  I really love mini clothespins and you can get a box for less than $3 in the office supply section at Wal-mart.  The clothespins allow you to change out your scriptures or even use photos.

 Set them aside to dry well.  Cut apart your mini calendars if needed and adhere to your other 3 panels as desired.  You can try to make up your own calendars with a computer program or do what I did and spend a $1 and download one here: http://www.artfire.com/ext/shop/studio/purpleponyart


 Now it's time for the ribbon!  Line up your panels so the backs are facing up.  Space them apart as much or little as you'd like and then take the ribbon and hot glue down both sides, leaving a loop for hanging at the top.  This photo shows the 2 bottom panels.  You only need to glue the ribbon to the top of the bottom panel. I glue all 4 corners of the other panels.

To make the back sturdier and look neater, adhere a card stock panel to the back of each panel over the ribbon. 


 Now for the fun part!  Get out your box of embellishments and go to town! That's my "pink" box! 

For your scripture panels, cut a decorative base or use a journaling box and stamp your scriptures and any decoration.  For the top panel, I used Inspired Stamps Strength Stamp Set. For the bottom panel, I used Favorites Collection 1 Stamp Set. On both, I used the doily stamp from Lovely Lace to decorate the edges. 


 I hope you have been able to understand my tutorial and that you will find some time to make a few of your own ribbon calendars!  The clothespins allow you to change out your scriptures or even use photos.


Thursday, May 17, 2012

Inspired Stamps Notepad Cover

I love this scripture and wanted to feature it front and center on the band of this project.  We were asked by Inspired Stamps to create a project other than a card this week and I jumped at the chance to create this notepad cover for a gift.  The clear-polymer stamp is from the Strength stamp set. 

 Here is the outside of the notepad holder.  These are so easy to make and really make a lovely gift.  (I found the instructions by Heidi Swapp on My Craft Channel). On the inside of the notepad holder, I used stamps from the gorgeous Blooms Stamp Set.

 Everyone owes it to themselves to have this versatile stamp set in their collection.  You will use it over and over for so many projects!  Just look at the detail of these flowers and frilly butterfly.  So sweet!
 
And here's the other side and more of the stamps from the same set.  I just love it!!  You could glue the notepad down if you wanted but I just cut a double slit in the center of the holder, covered the back of the pad and slid the pad in the slits.
Did you enjoy my project as much as I did?  I hope you'll make some today after stopping by the Inspired Stamps store.  And, as always, check out the blogs of all my fellow team members!

All other supplies:  Close To My Heart

Saturday, September 17, 2011

Dreamin' Easel Calendar

I have had fun making and teaching the 4x4 easel cards the last couple of weeks.  Thank you to Anoinette for the video tutorial.  While looking at one of the cards the other day, it hit me that they would make a cute desk calendar.  I had just received these mini calendars I had ordered from Skybluepink, so I got to work.

I am also submitting this to the color challenge at www.heart2heartchallenges.blogspot.com.  I used the gorgeous Dreamin' papers from Close To My Heart. The rolled flowers, leaves and bracket were cut from the CTMH AP cricut cart..  The bird medallion is just too cute for words and it is part of the CTMH Harvest Charms set.

Wednesday, May 11, 2011

Magnifique Scrapbook Frame


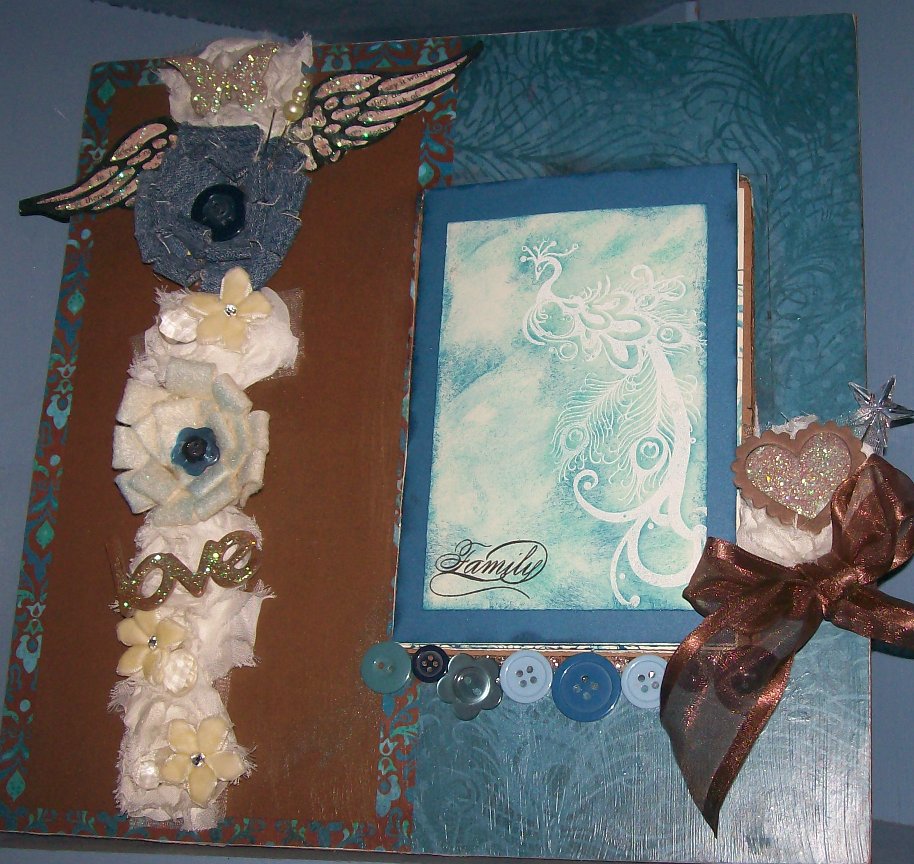
This project started as a kit I purchased from The Crafty Scrapper in Waxahachie (an AMAZING store). The original design was by one of their teachers- Annette Prudhomme.  Once I got it home though, I decided I really didn't like the paper and some of the embellies that came with it so I turned to my stash and decided the Close To My Heart Level 1 Magnifique papers I have been hoarding would be perfect.  I really love how it turned out with my changes and it is a great addition to my dining room.  Since I added buttons, I am submitting this project to the Button challenge at www.heart2heartchallenges.blogspot.com.

I loved her technique for the denim and cream felt flower.  You simply take a 1 1/2 x 12 strip of the fabric.  Fold it in half lengthwise and sew or glue the open edge closed. Once dry, cut the folded side at short intervals and then roll and glue the fabric on itself until you are happy with your flower.  The booklet is just 2 pieces of cardstock cut to fit the opening of the frame, I used waxy flax tied around the center to hold them together and then adhered the back cover to the glass with a tape runner.  For the Peacock, I used a resist technique by stamping it in Versamark and embossing it with white emb. powder.  I then used the 3 shades of ink and sponged it over the cardstock and embossed image.

Close To My Heart products used
Level 1 Magnifique paper
Colonial White and Pacifica Cardstock
Buttons
Circle of Love Stamp Set
Crystal Blue, Heavenly Blue and Pacifica Inks
Prisma Glitter
Liquid Glass
spray pen using pearl paint, water and dutch blue reinker
Colonial White Waxy Flax
White embossing powder and Versamark

Products from kit
denim for flower
felt for flower
organza flowers
velvet flowers
pins
chipboard
stamped wings
frame
hanging beads

From my stash: Brown ribbon and mod podge

Tuesday, April 19, 2011

Monkey Candy Box


I made this for a sweet little 8 yo boy I know who has just had surgery to remove a brain tumor.  Please say a prayer for him and his family.  Things do seem to be looking good at this point. 

I got the idea, to reuse this acetate box, from www.heart2heartchallenges.blogspot.com. They are having a reduce, reuse, recycle challenge this month.  This box began life as packaging for a roll of vinyl.  I wrapped it with 2 strips of CTMH paper from the Sophia and Caboodle collections. I edged the paper with our awesome Kraft Color Ready borders.  They are the most versatile and cost effective items we carry!  The monkey was cut with the Create A Critter cart with my Cricut using CTMH cardstock.  The sentiment stamp is from My Pink Stamper. I wrote his name with a CTMH marker on one of our Canvas buttons.  These can be stamped on as well.  Of course, I had to add some fun googly eyes from my stash!

Hope you'll think twice before you throw away packaging again!  I just keep a bin under a table to throw all my reusable packaging in.


Monday, April 18, 2011

H2H Bunny Blog Hop

  
The ladies at www.heart2heartchallenges.blogspot.com are starting a Bunny Blog Hop today.  You should head over there and check out all the fun Easter ideas or add your own Close To My Heart Easter project.
I made these cute little treats for my fellow Scrapbook Divas for our monthly Scrapping Bee at our church yesterday.  I found these clear pails on clearance at Container Store.  They are filled with colorful candy that pairs nicely with the cute Caboodle paper (retired) from CTMH.  The scallop rounds were cut with our punch out of our current Miracle paper.  The bunny was stamped using "A Hop" stamp set in Sorbet ink. The ribbon is also retired.  The sentiment stamp, flowers and rhinestones are not from CTMH.  
Leave me some love and have a blessed Easter!

Friday, March 25, 2011

Sweet Baby or Easter Basket


The challenge at www.heart2heartchallenges.blogspot.com this week is to create a baby item.  I decided to make something that would work for baby or Easter.  This basket started life as a vintage fruit box that you used to get at fruit stands.  My husband cleaned his parents' attic and found several of these.  Since he knows me so well, he knew I would repurpose them into something!

This is the perfect size to fill with baby stuff like powder, shampoo, washcloths or even diapers and sit out on the dresser or changing table.  I used the beautiful papers from the Sophia Collection from CTMH. 

The bunnies are from the CTMH stamp set A Hop.  I used Pear ink and 2nd generation stamped them.  I then cut them out and stamped them in Pear and Hollyhock ink with the flowers from the Tea Time stamp set.  I used our foam tape (LOVE this stuff) to pop them up and placed rhinestone flowers behind them (from Michaels).  The "Happy" is from the Sophia Stickease and has $1 rhinestones added from M's.

I used Pear ink again to color the Kraft Color-ready border (so INEXPENSIVE & so FUN) and attached to the top edge.  The final touch is the gorgeous ribbon flowers from Close To My Heart.  Hope you likey-leave me some love and let me know whatcha think!

Wednesday, January 19, 2011

Love

This is a simple 3x6 card that my guests will be making at a Gathering on Saturday.  All supplies are Close To My Heart.   I used the lovely papers from the Wings paper pack as well as the beautiful Bohemian Alphabet stamps.  I used my Cricut to cut out the squares and a decorative trimmer for the edge of the light paper.  To get the two tone lettering, I simply inked the top with Vineyard Berry and the bottom with Black.  With our clear stamps it is almost foolproof to do this. I inked the edges of the squares with Vineyard Berry and a sponge.

Tuesday, January 11, 2011

Wings Canvas and Candle

I had so much fun creating these 2 items for my bathroom!  I absolutely love the way they turned out.  The candle was not my idea.  I can not remember whose video I  watched to learn how to do this technique-I apologize!  Anyway, the candle is one I picked up cheap on clearance.  I cut the CTMH cardstock from the Cricut cartridge "Cindy Loo".  I then wrapped it around the candle and started on one edge with a heat gun and shot the candle with heat for a few seconds and then pressed the paper in to the softened wax.  I went all the way around until it was secured.  I decorated it further with pearls, ribbon and pearled hat pins.  I finished it off with a butterfly stamped with the "Find Your Style" stamp set from CTMH (only available through the end of the month).  I wrapped the middle of the butterfly with embroidery floss.

The canvas started out white.  I sprayed  on a mixture of Vineyard Berry re-inker, Pearl Paint and water mixed in our Spray Pen.  I then adhered a strip of paper from CTMH's "Wings" paper pack.  I printed the quote on a piece of vellum and adhered it with our cute little button brads.  The shoe and corner butterfly were stamped and embossed in black-both from the January "Find Your Style" stamps.  I sponged various colors in the blank spots and then added sparkle with our Glitz glitter glue.  The center embellishments are from our Wings Stickease.  I finished off the canvas with our ruffled ribbon and black lace from Michael's.  Let me know whatcha think!  I have plans to make 2 more small canvases and a large one to coordinate with this one.

Wednesday, November 17, 2010

Christmas Lip Balm

These are fabulous teacher gifts or just because gifts.  I cut various Christmas shapes with my Cricut and then used my Cuttlebug to emboss.  Sanded the wonderul CTMH cardstock to show the wintry white core.  Stamped various Christmas sentiments on a tag.  Punched two holes in the cards for ribbon and used a glue dot to put a lip balm between the holes.  Threaded ribbon and tag, tied the bow and all done!  If you would like to purchase instead of make, I have several left from the craft shows.  They are $2 + actual shipping.  Let me know!

Tuesday, November 16, 2010

Ornaments


I really had fun making these ornaments and thought they turned out beautifully.  I even decorated "take out" boxes to put them in.  I priced them under $5 and only sold a couple.  Can't figure that out.  Oh well, now I have Christmas presents all ready to give:-)  If you've never made these before they are super easy.  Buy clear glass balls.  Remove the tops and squirt in a bit of Pledge Future Floor Polish (yes, you read that right!).  Hold paper towel over opening and Swish around to cover the inside of the ball.  Pour excess out.  Sprinkle in some super fine glitter ( I like Martha Stewart's)  and cover the top with the paper towel again.  Shake till inside is coated with glitter.  Pour out excess glitter.  Put top back on and tie on a pretty ribbon.  I also added crystal "stickers" from the $1 bin at Michaels or single crystals/pearls.   The ones that are not glittered are made by dabbing on various colors of alcohol inks from Ranger Ink.

Monday, November 15, 2010

Turkey Stix

Hello all!  Thank you to everyone who joined in on the Veteran's Day Blog Hop on Thursday.  It was great to "meet" some new followers and "see" some old friends. I think I added 20 followers and I'm so thankful!  I am up to 52 and would like to hit 100 by New Year's.  Why?  It's just nice to know there are kindred crafters out in the wide world who take a look at what I am posting.  On that same note-I LOVE your comments!  Thank you to all those who took the time to do so-I felt warm all day Thursday from the kind words.

Now, what have I been up to?  Craft shows and making all the stuff to sell there.  I am one of those old fashioned gals who still believe a "craft" show should have handmade CRAFTS (or at least Cricutmade-hee hee).  Really, it saddens me to watch folks buy "made in China" cra_ at a Craft show.  Now stepping down off my soapbox.

My best sellers by far were these little M & M stixs. I did not come up with the idea but found it on the consultant's message board for CTMH.

 I welded 2 turkeys from the Cricut cartridge "Designer's Calendar" together and cut in CTMH chocolate Cardstock.  For most of them I then cut a single turkey out of Thanksgiving patterned paper I had left over from last year.  A few I just left plain and sanded the cardstock to show the detail.  I typed out the cute sentiment on my computer and just printed and trimmed.  The most time consuming part was stacking the M&Ms(and keeping them away from the hubby)!  I used 1x8 bags from www.clearbags.com.  Once you have the first one manipulated in the bag it gets easier to stack them.  I used a blunt wooden skewer to open the bag and slide them down and poke into place.  Then I folded over and sealed the bag, leaving a little space at the top to staple the turkey to.  I also made some Christmas ones (which I did NOT get a good pic of).  Again, I pretty much sold all 100 that I made.  Now I'll need to make more for family and friends!

Sunday, November 7, 2010

A Color Challenge

I've been a busy bee creating goodies to sell at craft shows this month.  I decided if I was going to have time to participate in the color challenge at www.heart2heartchallenges.blogspot.com I would just have to make it along with the items I'm doing in quantity to sell.  So was born this post-it holder!  I think I've made a 100 of these handy items, made from 5x7 acrylic frames, so it was fun to challenge myself to use colors I normally wouldn't.  The challenge colors were Indian Corn Blue, Brown Bag and Sunset.  Naturally I turned to the beautiful Olivia collection of papers from Close To My Heart as the background of my creation.  I was so lucky to find this fall colored post-it pad to coordinate.  I used Sunset ink to stamp the flower from The Present stamp set onto the notes.  I used Indian Corn Blue to stamp the sentiment from the same stamp set.  The edges of the sentiment card are sponged in Brown Bag ink.  I tied some CTMH Colonial White Waxy Flax (love this stuff! now I need to order more) around the frame and embellished with a flower from Recollections that I found in the after Halloween sale at Michaels. It needed a bit of sparkle so I added some orange gemstones.  All done in a jiffy!

Friday, October 15, 2010

Leaves & Lip Balm


The challenge this week at www.heart2heartchallenges.blogspot.com this week is leaves and trees.  It sparked a great idea on how to present these fall lip balms to friends, family or teachers.  I cut the leaf shape from the Doodlecharms Cricut cartridge using Close To My Heart cardstock in various shades of brown and then embossed them all in different folders with my Cuttlebug.  An emery board helped me reveal the white core of the cardstock.  I swiped various shades of CTMH ink over the leaves-brown bag, cocoa, goldrush.  To attach the lip balm tubes, I punched 2 holes in the center of the leaves, put a glue dot on the back of the tube for extra hold and tied a ribbon through the holes.  The tags are just scraps of cardstock that are stamped with various sentiments and leaves from the following CTMH sets: Flourished Blessings, Timeless and our current Petite Perk stamps.  Easy Peasy Lemon Squeezy!

Thursday, July 29, 2010

H2H week of 7/26

The sock "cupcake" made the rounds on the Cricut MB a few months ago.  I took the opportunity for this week's challenge at www.heart2heartchallenges.blogspot.com to make a few for gifts for fellow scrapbook retreat goers.  The challenge was to use the Close To My Heart colors of Blush, Vineyard Berry and Creme' Brulee'.  I cut 2 cupcake wrappers using my Cricut. I did not have CTMH Vineyard Berry ink or paper so I used another brand for that layer of cardstock.  I cut off the decorative top of the blush cupcake wrapper and then stamped it in blush using  the CTMH Rock Star stamps.  I used a blender pen to accent with Creme Brulee'.  I cut out a few stamped stars and affixed to the edge of the blush layer. I used pink pearls from my stash to decorate the top of the wrapper.  The frosted cupcake is actually a spa sock from Michaels rolled up and put inside the wrapper.  Glitz glitter glue from CTMH frosted the stars and stamping.  I used CTMH organdy ribbon and another cutout star to top off my confection.  No calorie sweetness-my favorite!

Thursday, July 22, 2010

H2H Recipe Challenge

This is for the H2H "recipe" challenge  www.heart2heartchallenges.blogspot.com.  I took a hot pink jumbo clip and used mod podge to adhere Cherry O papers and Stickease.  I also used Liquid Glass and Glitz glitter glue to sparkle it up.  I used a piece of Cherry O LV 1 paper for the recipe card and added a journaling block from the Stickease collection as well as some stamping from the Bowl of Cherries stamp set.  A sweet button and bow top it off.  All is Close To My Heart product except the clip.  Sorry to be brief but...Gotta run!

Friday, June 18, 2010

Masculine Notepad Holder

In honor of Father's Day and to enter the H2H challenge (www.heart2heartchallenges.blogspot.com), I created a masculine post-it note holder.  The challenge was to use recycled materials and scraps.  I love this because I don't throw anything away if I think I can use it to craft.  These post-it note holders are perfect to use up bits of paper and embellies.  I started with a $1 acrylic frame.  The paper was from the Felicity collection from Close To My Heart and literally came from my scrap drawer.  The stars are rusty metal stars from an old 4th of July decoration that I took apart last year-  I thought about painting them but I really like the rusty, rustic look as is..  The CTMH Waxy Flax is the only thing I used to embellish that was new from the package.   I have had the metal "forever" tag forever!-it was leftover from a whole set of them-it was the last!  I stamped the top note with a stamp from the CTMH "Shining Star" set in Chocolate ink.

Wednesday, May 5, 2010

Mother's Day Gift

I made this for my 82 yo mom.  My parents are godly people with great faith.  I am going to put cards inside with the names of each of their children, grandchildren, great grandchildren and great-great grandchildren.  I will ask them to put a favorite scripture and/or prayer or thought on each card for the person listed on that card.  I hope they will be able to do this while they can.

All of the papers, ink and stamps are Close To My Heart (cardstock, Bella and Veranda).  The stamps are from Beloved and Delightful Things.  Ink is Hyacinth.  I did use a Copic marker to color the dove.  The flowers are Prima and I don't remember who made the pins.  The rhinestone word is from Michael's $ bin.

I am submitting this to www.heart2heartchallenges.blogspot.com for the current challenge of making something for Mother's Day.